Sign up now to unlock Rewards offers.
Free standard next‑day delivery to most UK areas

Wall Hung Toilet Installation Guide Benefits and Steps
Learn wall hung toilet installation with framing plumbing carrier setup bidet seat requirements tools step by step guidance and repair tips
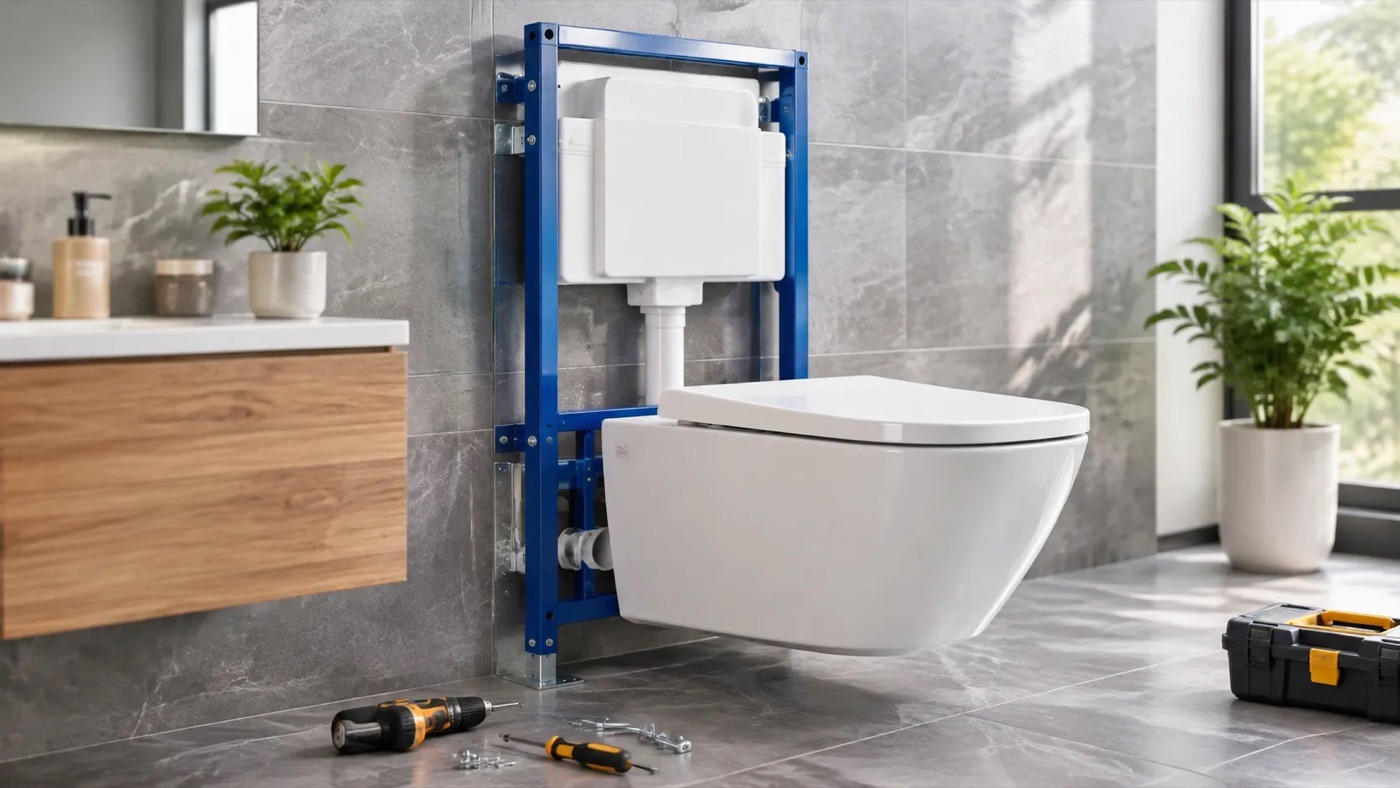
Understanding Wall-Hung Toilets: Benefits and How They Work
Wall-hung toilets decouple the functional hardware from the visible fixture, replacing traditional bulky base units with an elevated, minimalist design. A proper wall hung toilet installation relies on hidden engineering to deliver superior performance, structural stability, and an open floor plan suitable for contemporary residential and commercial bathrooms worldwide.
How In-Wall Carrier Systems Function
At the core of every installation is an in-wall carrier system—a heavy-gauge, powder-coated steel chassis anchored directly to the building framing and subfloor.
- Load-Bearing Architecture: The steel frame absorbs all dynamic and static loads, transferring weight down through the floor joists and into structural studs rather than the wall surface.
- Concealed Cistern Engineering: The blow-molded, high-density polyethylene (HDPE) water tank sits encased within the frame, fully insulated against condensation and operational flush noise.
- Integrated Supply and Waste Paths: Rigid alignment brackets lock the water feed and horizontal waste elbow into place before wall cladding begins.
- Tool-Free Internal Access: The flush actuator plate on the finished wall serves as a service port, providing direct access to the fill and flush valves without cutting into drywall or tile.
| Component | Function | Engineering Advantage |
|---|---|---|
| Steel Carrier Frame | Structural support | Handles up to 400 kg (880 lbs) of static load |
| Concealed Cistern | Water storage and delivery | Insulated to eliminate tank sweating and dampen sound |
| Actuator Plate | User interface & service portal | Offers dual-flush control and snap-off maintenance access |
| Discharge Elbow | Waste redirection | Connects seamlessly to standard 3-inch or 4-inch DWV stacks |
Key Benefits: Space-Saving, Hygiene, and Modern Design
Upgrading to a wall hung cistern installation delivers clear architectural and sanitary advantages over conventional floor-mounted units:
- Footprint Reduction: Mounting the tank inside the wall frees up 8 to 12 inches (20 to 30 cm) of valuable floor space, making compact layouts feel significantly larger.
- Uncompromised Sanitation: Eliminating the toilet base, mounting bolts, and silicone floor seams removes the primary collection points for dust, urine, and bacteria. A mop moves straight beneath the bowl.
- Custom Height Flexibility: During the wall hung toilet fitting stage, installers can set the bowl height anywhere between 15 inches (standard) to 19 inches (ADA-compliant comfort height) to match user needs.
- Clean Architectural Lines: Only the porcelain bowl and flush actuator remain visible, complementing modern tile work and minimalist interiors.
Pre-Installation Requirements and Framing Specifications
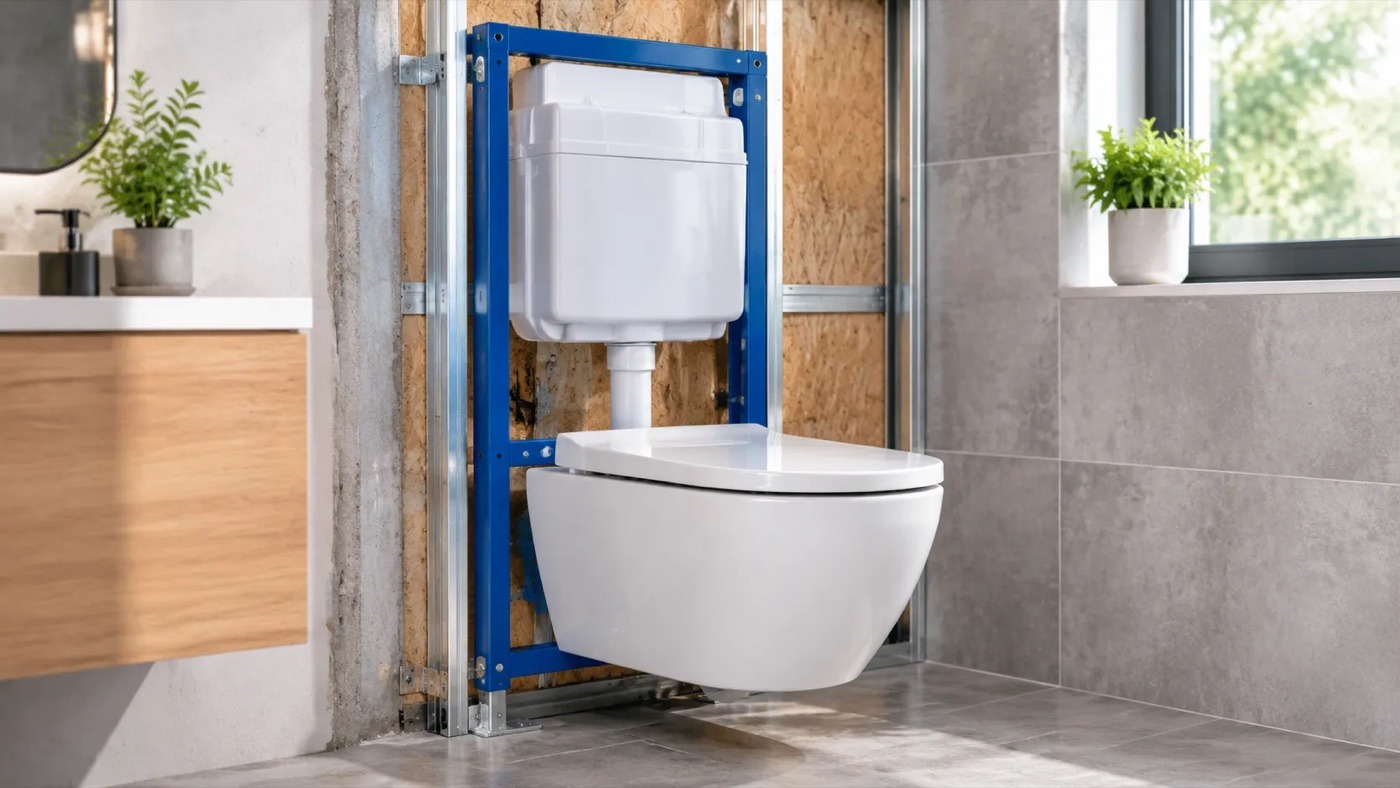
Proper planning defines the success of any wall hung toilet installation. Because the carrier system and plumbing hardware sit entirely concealed behind finished drywall, every dimension, stud placement, and rough-in pipe must be exact before closing the wall.
Wall Framing Requirements: 2x4 vs. 2x6 Studs
Most standard in-wall tank carriers require specific stud bay depths to handle static loads up to 880 lbs (400 kg). Choosing between 2x4 and 2x6 lumber dictates which carrier frame you can purchase and how much usable floor space you retain.
| Framing Size | Actual Stud Depth | Recommended Carrier Type | Best Use Case |
|---|---|---|---|
| 2x4 Framing | 3.5 inches (89 mm) | Slimline concealed carriers | Powder rooms, compact retrofits, space-saving designs |
| 2x6 Framing | 5.5 inches (140 mm) | Standard heavy-duty carriers | Master baths, exterior walls, integrated side venting runs |
For a rock-solid wall hung toilet fitting, we build out the support structure with structural integrity in mind: Double-up Studs: Box out the carrier bay with doubled 2x4s or 2x6s on both the left and right sides to prevent wall deflection when weight is applied. Top and Bottom Blocking: Anchor 2x structural timber headers directly above the steel carrier frame. Base Plate Anchoring: Bolt the bottom runner directly into concrete subfloors with heavy-duty wedge anchors or secure through wood joists with structural lag screws.
Plumbing, Drainage Rough-In, and Venting Setup
Drain line alignment requires absolute precision when planning how to install wall hung toilet systems. Unlike standard floor-mounted flanges, the waste outlet must exit through the wall frame horizontally or drop vertically inside the wall cavity.
- Waste Line Sizing: Use a 3-inch (90 mm or 110 mm) DWV waste pipe connected directly to the carrier's discharge elbow.
- Proper Drain Slope: Maintain a strict 1/4-inch per foot (approx. 2% slope) downward pitch on all horizontal waste runs to eliminate clogging risks.
- Venting Placement: Tie the vent pipe into the main soil stack above the carrier line. Keep the vent within 6 feet of the fixture trap to prevent siphonage and maintain rapid tank flushing velocity.
Water Supply and Electrical Requirements for Bidet Seats
Modern bathrooms frequently integrate electronic washlets, heated seats, or bidet functions alongside a wall hung cistern installation. We run these utilities into the stud bay before hanging cement board:
- Cold Water Feed: Run a rigid 1/2-inch copper or PEX water supply line directly to the designated inlet stop valve inside the top or rear port of the carrier reservoir.
- Auxiliary Hygiene Lines: If you prefer non-electric options, plumb an accessible mixed-water supply to accommodate a hot and cold handheld bidet sprayer kitalongside the bowl.
- GFCI Electrical Outlets: Position a dedicated 15A or 20A GFCI electrical outlet inside the adjacent wall cavity or low on the exterior wall (approx. 6 to 12 inches off the finished floor) to power luxury bidet attachments safely.
Essential Tools and Materials Needed
A successful wall hung toilet installation depends on having the correct equipment ready before opening up the wall. Using the right trade tools guarantees a leak-free plumbing layout and a rock-solid frame that never shifts under load.
Required Plumbing and Framing Tools
We rely on standard framing and plumbing equipment to complete the job accurately:
- Torpedo and Long Spirit Levels: Essential for checking vertical plumb and horizontal level across the steel frame and toilet bowl.
- Impact Driver and Drill Bits: Necessary to drive heavy structural lag bolts into timber studs or masonry.
- Adjustable Wrenches and Socket Set: Required to tighten carrier mounting bolts, supply valves, and bowl-fixing nuts.
- Hacksaw or PVC Pipe Cutter: Used to trim the flush pipe, waste sleeve, and threaded steel rods to custom wall depths.
- Tape Measure and Marking Pencil: Critical for aligning exact finished-floor heights and centerlines.
Necessary Hardware, Sealants, and Carrier Components
| Item | Purpose |
|---|---|
| In-Wall Carrier Frame | The heavy-duty structural steel frame holding the concealed cistern and bowl. |
| Heavy-Duty Lag Screws | Anchor the frame securely to floor joists, concrete slabs, and wall studs. |
| Threaded Support Rods | Steel hanging bolts that extend past the wall surface to hold the toilet pan. |
| Sanitary Silicone Sealant | Waterproof sealant applied behind the bowl rim to buffer against the finished tile. |
| PTFE Thread Tape | Creates watertight joints on all threaded water intake connections. |
| Discharge and Flush Sleeves | Rubber and plastic connector pipes linking the bowl to the in-wall waste system. |
For installations tailored to commercial settings or accessible suites, keep structural reinforcements and complementary safety gear on hand, such as an adjacent toilet handrail anchored directly into the framing. Having every fitting ready prevents delays once rough-in begins.
Step-by-Step Wall-Hung Toilet Installation Guide
Properly executing a wall-hung toilet installation requires precision and attention to detail, as the carrier system is concealed behind the wall. Following these steps ensures a secure, leak-free, and long-lasting fixture.
Step 1: Frame the Wall and Secure the In-Wall Carrier
The in-wall carrier is the foundation of your installation. First, ensure your wall studs are properly reinforced to support the weight of the carrier and the toilet bowl. Position the steel frame within the stud bay, ensuring it is perfectly level both horizontally and vertically. Secure the frame to the studs using the manufacturer-provided heavy-duty lag bolts. Check the manufacturer's height specifications for the bowl mounting bolts—typically around 11 to 13 inches from the finished floor—and adjust the frame feet accordingly before locking them in place.
Step 2: Connect the Waste Drainage and Water Supply Lines
Once the carrier is secured, route the waste drainage pipe to the carrier’s outlet and the water supply line to the designated intake valve on the tank. Use high-quality PVC or ABS piping and ensure all connections are watertight and properly sloped for effective drainage. If you are in the planning stage of your bathroom layout, refer to this guide to basin sizes, toilet sizes, and shower enclosure sizesto ensure proper clearance and optimal space utilization. Test all connections by briefly turning on the water supply to check for any leaks before proceeding to close the wall.
Step 3: Close the Wall with Drywall and Tile Finishes
After verifying the plumbing, seal the area around the carrier. Use moisture-resistant drywall or cement board to cover the wall, cutting precise openings for the waste pipe, the toilet mounting bolts, and the flush actuator plate. Once the board is installed, apply your chosen wall finish, such as tile or waterproof paneling. Ensure the material is thick enough to sit flush against the carrier’s mounting surface. Use a high-grade silicone sealant around all pipe penetrations to prevent water from seeping behind the wall.
Step 4: Mount the Toilet Bowl and Install the Flush Actuator Plate
After the wall finish has set, attach the provided threaded rods to the carrier if they are not already installed. Slide the toilet bowl onto the rods, ensuring the waste outlet aligns perfectly with the seal in the wall. Tighten the mounting nuts gradually to ensure the bowl is held firmly against the wall without over-tightening and cracking the ceramic. Finally, connect the flush mechanism to the actuator plate and snap the plate into place. Test the flush several times to ensure smooth operation and complete, quiet drainage.
Common Installation Mistakes and How to Avoid Them
In our experience with modern bathroom fittings, most failures stem from minor oversights during the rough-in stage rather than product defects. A botched wall hung toilet installation often requires tearing out finished tilework to fix. Sidestepping these critical errors early is just as essential as avoiding a top design mistake of bathrooms and how to avoid costly structural reworks later.
Improper Carrier Height and Uneven Leveling
Setting the frame at the wrong height is the most common blunder we see on site. Once the wall is closed and tiled, adjusting the bowl height is virtually impossible.
- Calculate Finished Floor Height (FFH): Never set your frame height based on the bare subfloor. You must account for the full build-up, including backer board, mortar, and the tile itself.
- Target Rim Height: Standard finished bowl height sits between 15 to 17 inches (380 to 430 mm) from the finished floor, while accessible setups require 17 to 19 inches.
- Dual-Axis Leveling: Check both horizontal crossbars and vertical uprights with a spirit level before torquing down anchor bolts. Even a minor tilt of 1/8 inch will make the wall hung toilet fitting look crooked and place uneven strain on the ceramic bowl.
Inadequate Wall Reinforcement and Support
A suspended bowl relies entirely on the structural integrity of the wall framing. If the studs flex, the grout lines will crack, the tiles will pop, and the seals inside the wall will fail.
- Solid Floor Anchoring: Bolt the carrier feet directly into the floor joists or a solid concrete slab using heavy-duty masonry anchors or lag bolts.
- Rigid Stud Framework: When mounting into stud walls, use structural 2x6 timber or double up your 2x4 framing. Secure cross-blocking tightly around the upper brackets to prevent back-and-forth movement.
- Double-Sheathing the Wall Face: Always install a double layer of moisture-resistant drywall or an 18 mm structural cement backer board over the front of the frame. This stops the wall from bowing when full body weight is applied to the bowl.
Drain Line Slope Errors Leading to Leaks
Concealed drainage leaves zero margin for improper alignment. Incorrect waste pipe angles will trigger recurring clogs or hidden slow leaks.
- Maintain Correct Fall: Set the waste discharge pipe with a consistent slope of 1/4 inch per foot (approximately a 1:40 to 1:50 drop). An angle that is too steep lets water outrun solid waste, while an insufficient slope causes standing water and blockages.
- Avoid Forcing Connections: The waste elbow and supply flush pipe must sit completely square. Forcing misaligned pipes together pinches the internal rubber gaskets, which causes leaks behind your drywall.
- Use Pipe Lubricant: Always coat rubber O-rings with silicone lubricant or soapy water during your wall hung cistern installation. Assembling them dry will tear or roll the seals out of their grooves.
- Pressure-Test Before Closing: Never hang drywall until you run multiple test flushes through the system with the water turned fully on. Check every joint with a dry paper towel to spot any micro-leaks immediately.
Frequently Asked Questions About Wall-Hung Toilet Installation
Can I replace a standard floor-mounted toilet with a wall-hung model?
Yes, you can swap out a standard floor-mounted unit, but it is not a direct plug-and-play replacement. A proper wall hung toilet installation requires opening the wall cavity down to the studs to mount the heavy-gauge carrier frame.
- Drain line relocation: You must re-route your existing floor drain through the subfloor into a horizontal wall discharge.
- Framing adjustments: Standard 2x4 or 2x6 studs must be exposed, plumbed, and securely tied to the frame.
If you are already planning a bathroom remodel, it is the ideal time to upgrade. Reviewing our comprehensive guide covering everything you need to know about wall-hung toilets will help you map out the structural requirements before tearing out your existing fixtures.
How much weight can a wall-hung toilet safely support?
When installed correctly to the framing studs, a wall-hung toilet system is exceptionally rigid and safe.
- Load Rating: Standard in-wall carrier systems are engineered and tested to support up to 880 lbs (400 kg) in compliance with global ASME and EN standards.
- Weight Transfer: The heavy-duty steel carrier bolted directly into the floor joists and vertical studs carries the actual weight—not the finished drywall or decorative tile.
As long as your structural studs are sound and the carrier feet are securely anchored to the subfloor, the toilet bowl will not sag, flex, or pull free from the wall.
How do you repair and service a concealed in-wall tank?
A common misconception is that servicing an in-wall tank requires breaking through finished tile. Modern concealed systems are engineered for complete tool-free maintenance from the front:
- Removal: The flush actuator plate unclips directly from the wall by lifting and pulling forward.
- Access: The opening behind the plate acts as a dedicated access hatch into the reservoir.
- Maintenance: You can reach inside to adjust the water level, inspect seals, and remove the fill valve or flush valve assembly for replacement.
Familiarizing yourself with everything you need to know about wall-hung toilet cisterns makes routine repairs straightforward without compromising your bathroom walls.
Durovin Bathrooms are based in Walsall, UK and a bathroom supplier to mainland UK. We sell a wide range of products for anyone to improve their bathrooms.
Read More About UsAddress
Unit 14 Bentley Lane Industrial Park, Bentley Lane, Walsall, WS2 8TL
E-Mail us
info@durovinbathrooms.co.ukPhone
01922 627 773© Durovin Bathrooms® 2025